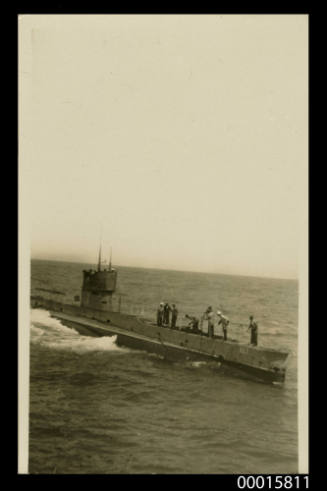

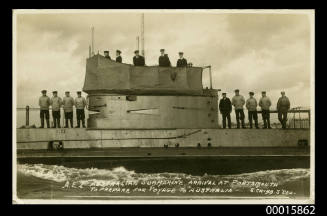
Submarine AE2 with crew on deck, Portsmouth 17 February 1914
Photographer
Stephen Cribb
Date17 February 1914
Object number00015809
NamePostcard
MediumSilver gelatin print on paper
DimensionsDisplay dimensions: 91 × 140 mm
ClassificationsPhotographs
Credit LineANMM Collection Gift from Mrs D Smyth
DescriptionThis photograpah, dated February 17 1914, shows the arrival of the submarine HMAS AE2 into Portsmouth, England.
She was built, along with HMAS AE1 for the Royal Australian Navy by Vickers-Armstrongs at Barrow-in-Furness, England and commissioned at Portsmouth on 28 February 1914.HistoryHMAS AE2 was an E class submarine of the Royal Australian Navy (RAN). It was one of two submarines - the other being AE1 - ordered by the Australian government from Britain in 1911, just after the RAN was formed.
AE2 was laid down on 10 February 1912 at Vickers Armstrong yard at Barrow-in-Furness, England and launched on 18 June 1913. The vessel was commissioned into the RAN at Portsmouth on 28 February 1914 under command of Lieutenant Commander Henry H.G.D. Stoker, RN. Accompanied by AE1, AE2 reached Sydney on 24 May 1914, manned by Royal Navy (RN) officers, with a mixed crew of RN and RAN sailors. At the time this was the longest submarine voyage in history.
Upon the outbreak of World War I in August 1914, both submarines mobilised in September as part of the Australian Naval and Military Expeditionary Force (ANMEF) sent to secure German New Guinea and other German possessions in the Pacific. With German surrender successfully achieved within a matter of weeks, AE2 returned to Sydney via Suva. This may have been where the mascot in the photograph was obtained.
AE1 had been lost while on patrol on 14 September 1914. It disappeared without a trace off the Duke of York Islands under unknown circumstances, which have not been explained to this day.
AE2 then went on to Albany in Western Australia. On 31 December 1914, AE2 was towed from Albany by SS BERRIMA as part of a troop convoy across the Indian Ocean, arriving at Port Said on 28 January 1915. AE2 was the only naval escort vessel for this convoy.
AE2 then received orders to join the RN’s 2nd Submarine Flotilla based at the island of Tenedos.
As part of the naval operations during the Dardanelles/Gallipoli Campaign, AE2 made a first offensive foray into the Dardanelles on 24 April, penetrating nearly six nautical miles (11 km) before being forced back with mechanical problems.
At 2.30am on 25 April 1915, Commander Stoker again attempted to get through the heavily mined and fortified straits that had on 18 March stopped a massive Allied naval assualt (and meant the Gallipoli Peninsular had to be attacked by land).
At approximately 4.30am, Stoker dived the boat in response to fire from Turkish gun crews that had spotted her. By 6am, AE2 had reached Chanak, at the narrowest part of the strait, and then fired a torpedo at the Turkish gunboat PEYK I SEVKET, while simultaneously taking evasive action to avoid an enemy destroyer. During this action, the boat ran aground directly under one of the Turkish forts; fortunately the fort was unable to lower its guns far enough to hit the AE2. After four minutes in an exposed position on the bank, AE2 slid back into deeper water.
Shortly after grounding a second time, AE2's periscope was sighted by a Turkish battleship firing over the peninsular at British positions on Cape Hellas, causing it to cease shelling, withdraw and relocate to a safer position. AE2 continued to advance toward the Sea of Marmara. At 8.30am Stoker decided to rest the boat on the sea-floor during daytime, waiting for nightfall. Upon surfacing during the night, he sighted no enemy craft and again ventured into the Sea of Marmara, becoming the first Allied submarine to breach Turkish defences in the Dardanelles.
Stoker signalled his success to his HQ, where discussions were being held about the possibility of retreat by re-embarking the land force, which had encountered unanticipated difficulties immediately after the Gallipoli landings. The news of AE2’s success may have influenced the decision not to withdraw and the news that an Australian submarine had breached the straits was spread among ANZAC troops.
Stoker had been given vague orders to 'run amok' in the Sea of Marmara. His tactics were to give the impression that several submarines were in the area. However, AE2 was suffering mechanical problems.
On 30 April, the problems caused AE2 to rise to the surface about 1 mile (1.8 km) from the Turkish torpedo boat SULTANHISAR. AE2 dived below safe diving depth and frantic attempts to correct this caused the submarine's stern to break the surface, which was immediately fired on again by the SULTANHISAR.
Stoker ordered his crew to abandon ship. All 35 members of the crew survived the action, although three men died during the three and a half years they subsequently spent as prisoners of war in Turkey.
The wreck was located in 1998 at a depth of 72m by a Turkish maritime archaeologist. In 2014 a joint Turkish-Australian team placed a Remote Operating Vehicle inside the submarine to obtain footage of the interior - seen for the first time since 1914. The interior proved to be remarkably intact and AE2 has been secured and will remain in situ as the best method of preservation.SignificanceThe story of the AE2 and her infiltration of the Dardanelles in World War I is a highly significant Allied military and Australian naval episode. Although the event did not ultimately alter the course of the war it did demonstrate to Britain that Turkish waters could be breached. Subsequent submarine activity there by E11 and E14 severely hampered Turkish efforts to reinforce and supply their troops engaged at Gallipoli by forcing them to take the more arduous overland route.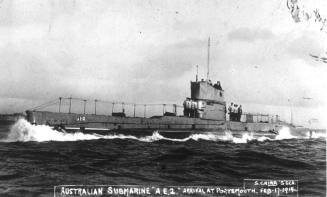

18 June 1913
1931-1939