HMAS SYDNEY II
Model Maker
Mike Bass
Date2004
Object number00039670
NameModel
MediumPlastic, paint, wood
DimensionsOverall: 530 x 1790 x 180 mm
ClassificationsModels
Credit LineANMM Collection
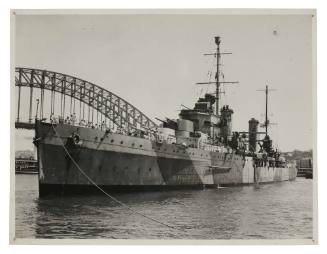
DescriptionThe ship model represents HMAS SYDNEY II at a scale of 1: 96 and was commissioned for the National Maritime Museum. It depicts the 'Leander class' light cruiser decorated in its camouflage geometric paint scheme, applied immediately after SYDNEY's victory at Cape Spada. SYDNEY was sunk off the Western Australian coast in 1941 after a battle with the German raider HSK KOMORAN. It became a national World War II symbol for the Australian public.HistoryHMAS SYDNEY (II) was built by Swan, Hunter and Wigham Richardson Ltd. at Wallsend on Tyne in 1933 and launched in 1934. This light cruiser was built for the Royal Australian Navy (RAN) and named for the first HMAS SYDNEY (1911- 1928)
Upon the outbreak of World War II, the SYDNEY undertook patrol duties in home waters until April 1940, when she made for the Mediterranean to join the Royal Navy's 7th Mediterranean Cruiser Squadron. Actions soon followed, such as participation in the bombardment of Bardia (Libya), the Battle of Calabria on 9 July and the Battle of Cape Spada on 19 July 1940. During the latter battle, the SYDNEY led several Royal Navy destroyers in an attack on the Italian cruisers BARTOLOMEO COLLEONI and GIOVANNI DELLE BANDE NERE; sinking the BARTOLOMEO COLLEONI. After this successful engagement SYDNEY took part in the second bombardment of Bardia and in operations in the Straits of Otranto and the Adriatic.
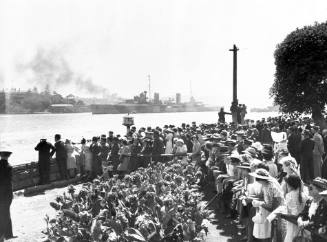
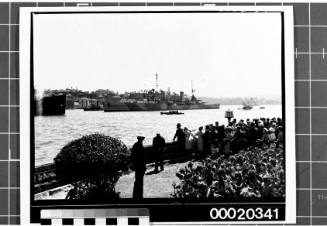
By January 1941 the cruiser was in need of a refit and its crew in need of a rest. The cruiser returned to Sydney to a hero's welcome on 10 February 1941. On the following day an estimated 250,000 Sydneysiders lined George Street as the crew marched to a civic reception at Town Hall.
After a refit at Garden Island and a change of command, with Captain John Collins replaced by Captain Joseph Burnett, HMAS SYDNEY took up duty as a convoy escort in Western Australian waters.
It was here that she encountered by chance the German raider HSK KORMORAN (Capt. Theodor Detmers) in the late afternoon of 19 November 1941. A short, fierce battle ensued which resulted in the sinking of both vessels.
It was the largest loss of life suffered by the RAN during a single action; all of the 645 men in SYDNEY's crew were killed. It is thought that scores of men and most of the officers, including Captain Burnett, probably died in the devastating opening bursts of gunfire from the raider, which immediately knocked out SYDNEY's bridge and directory tower. The two forward turrets were knocked out soon afterwards, when a torpedo, fired by the KORMORAN, also struck approximately 20m aft of SYDNEY's bow. Accurate machine gun and 'ack ack' fire raked the SYDNEY’s gun decks preventing the secondary guns from being used.
Ablaze and already substantially incapacitated within the first five minutes, the crippled RAN cruiser returned fire from the rear turrets, fatally hitting the raider in turn, but also continuously received hits from several of the KORMORAN's guns, which continued firing at a rate of two for every one of SYDNEY's salvoes. The last shot was fired approximately one hour after the first salvo; most survivor accounts agree that the first shots were more or less simultaneous, but that it took SYDNEY's gunners more time to get an accurate range on the KORMORAN.
Notwithstanding, the SYDNEY's salvoes set fire to the KORMORAN's stern section, hitting an auxiliary oil tank and causing major flooding in the engine room which put several boilers out of action. Other hits damaged the fire-fighting gear to such an extent that Capt. Detmers ordered the crew to abandon ship lest the uncontainable fire reach the mines and ammunition stores and blow up the vessel.
Setting delayed time charges to scuttle the vessel, the Germans abandoned their stricken ship at approximately 9pm, after which they observed the badly damaged cruiser slowly steaming away in the distance. The disabled cruiser's lights and flickering fires on board were seen "glowing" on the horizon by KORMORAN survivors at approximately 11pm; and then were apparently no longer visible by the time the mines in the KORMORAN exploded, at approximately 00.30am, having been set off by the exploding charges placed to scuttle the raider.
Of the KORMORAN’s crew of 397 officers and men, 318 survived in the ship's boats and on life rafts; among them three of four Chinese laundrymen taken prisoner 10 months earlier. The ship's dog and a pet monkey also survived and made it to shore in one of the lifeboats, but were later put down by quarantine officers.
The loss of the SYDNEY was devastating for the RAN and the Australian people; the impact on the home front was similar to the shock and disbelief experienced in Britain after the loss of the RN's flagship HMS HOOD following its' engagement with the BISMARCK. Bewildered by what had happened, the Australian Government maintained secrecy, censoring publication of any details. Finally, 11 days after the battle, the Prime Minister made the first of two brief public announcements confirming rampant rumours that the SYDNEY had been lost with all hands.
However, no explanation was given about how the cruiser had been sunk and how all of the crew had perished; while 318 of the KORMORAN's 397 crew had been rescued. This sparked controversy; essentially arising from two circumstances. First, there were no Australian survivors to give an account of the action. Second, if the Germans' accounts were true, it implied that before the battle had started SYDNEY had placed herself in a position of extreme vulnerability. This was so inconceivable that most people doubted the German accounts.
Instead, a perception sprang up that important information was being withheld. The perception was reinforced by several factors: the government announcements lack of any tenable explanation and the secrecy which subsequently came to surround the official investigation. The suspicion that the full story was not being told was fanned by persistent press reports speculating, sometimes rather fancifully, about what might have happened. However, the official silence appears to have been because the government was unable to explain the catastrophe. As the Prime Minister put it, "...her actual fate, in the absence of other evidence, must remain a mystery".
Apart from the two brief statements by the Prime Minister on 30 November and 3 December 1941, no additional information was officially released until publication in 1957 of a study that was regarded as an official history of the Royal Australian Navy in World War II.
However, publication of an official RAN war history in 1957 did almost nothing to satisfy those still seeking answers to the most pressing questions. For example, how was it possible that more than 300 German survivors were rescued while all of the 645 men on board the SYDNEY had died? How was it that the SYDNEY, in spite of its superior fire power and better armour-plating, had been sunk by a vessel carrying lesser firepower? Why had no distress signal been sent? With all of SYDNEY’s fire power trained on the KORMORAN, how was it that the raider apparently had time to remove her camouflage, identify herself by running up the German navy's battle ensign; and perhaps also fire the first shots?
Despite the official history’s contention that the account it presented of the SYDNEY’s last hours was reconstructed following "...exhaustive interrogation of KORMORAN’s survivors", its lack of satisfactory answers to these and many other questions confirmed the suspicion about a continuing cover-up. Not surprisingly, suspicions were not allayed by the fact that the official history had been written by Lieutenant Commander George Hermon Gill, the Navy’s wartime censorship liaison officer, who had been the main proponent of the view that details about the SYDNEY’s engagement with the KORMORAN should not be made public!
Thus, with no further official communiqués and press releases forthcoming, the gaps were filled in by a number of books, including one in 1959 by the KORMORAN’s captain, another by the writer Geoffrey Scott in 1962 and another by Vice Admiral Sir John Collins, SYDNEY's former C.O.
During the 1970s and 1980s, the wreck of HMAS SYDNEY -the mystery of its demise still a subject of controversy and a variety of claims, conspiracy theories and conjecture - was the objective of a number of deliberate deep-sea searches. But the wreck was not located until March 2008. 66 years after the sinking, it was detected by sophisticated, remotely-operated sonar devices approximately 130 miles off Steep Point (Shark Bay) at a depth of over 2400m, 10 kilometres from the wreck of the KORMORAN, which had been pin-pointed several days earlier at over 2500m depth by the same expedition mobilised by the 'Find the Sydney Foundation'.
With the physical evidence presented by the location and deposition of the two wrecks to hand, a Commission of Inquiry into the loss of HMAS SYDNEY was subsequently held in 2009 at the Australian government's behest, chaired by Terence Cole QC.
The 'Cole Commission', which sat for 36 days and generated more than 2500 pages of testimony, found that none of the various conspiracy theories about the cruiser's sinking were plausible; finding instead that the SYDNEY's captain, while exchanging signals with the KORMORAN (then still disguised as a Dutch merchant ship) had inexplicably made the assessment that he was investigating a friendly vessel. This assessment was inexplicable because he had apparently ignored available, up-to-date shipping intelligence indicating that no friendly merchant vessels could be expected within a 300 mile radius of his position on that day. If he had made a different assessment he would surely not have brought his warship so close -i.e. to less than 1300m- to the disguised German raider! Possibly also, because of Capt. Burnett's assessment the SYDNEY's crew were not yet all at action stations, i.e. a number of SYDNEY's secondary guns were not yet manned.
The inquiry concluded, having also taken into consideration the empirical evidence -ROV digital footage and stills- from the wreck, that Captain Detmers had successfully used acceptable 'ruse de guerre' tactics to lure the Australian warship closer and had opened fire at close range when he could no longer plausibly answer the questions SYDNEY's commander was asking him.
The extremely accurate German gunnery -and single torpedo hit- had so grievously crippled and damaged the SYDNEY that she had sunk with all hands several hours later. Several hundred men, including Captain Joseph Burnett and most of his officers, had likely been killed or severely wounded by the opening bursts of KORMORAN's gunfire in which SYDNEY's directory tower, bridge -then full of officers' "white caps" according to the testimony of a German survivor- and secondary gun platforms were enfiladed by accurate, high explosive 150mm calibre shells, 37mm and 20mm machine gun and 'ack-ack' fire. Moreover, most of the cruiser's lifeboats and life rafts had also been so heavily damaged as a result of the German's lethal 'small arms' fire that they had been rendered useless for survivors.
Why Captain Burnett was not more suspicious of the ship being investigated remains a matter of conjecture.
The inquiry corroborated wartime testimony of the German survivors; dismissing other theories and claims about the disaster. These had included claims of a faked surrender and of deliberate obfuscation about the ship's position by the German captain and charges that the KORMORAN had opened fire before lowering his (false) Dutch colours and raising the Kriegsmarine's battle ensign. As well as a theory that is arguably as preposterous as it is ludicrous, contending that a Japanese submarine had torpedoed the SYDNEY and subsequently machine-gunned in the water all of its survivors to prevent them from reporting to the world the Imperial Japanese Navy's collusion in the SYDNEY's demise.
Links:
Australian War Memorial site:
http://www.awm.gov.au/encyclopedia/hmas_sydney/action.asp
http://www.awm.gov.au/encyclopedia/hmas_sydney/index.asp
RAN History/ Sea Power Centre site:
http://www.navy.gov.au/HMAS_Sydney_%28II%29#The_Battle_of_Calabria
Dept of Defence:
http://www.defence.gov.au/sydneyii/finalreport/index.htmlSignificanceThis model is an accurate representation of an important ship of the Royal Australian Navy (RAN) and World War II. It highlights the tragic loss of HMAS SYDNEY and its crew in 1941.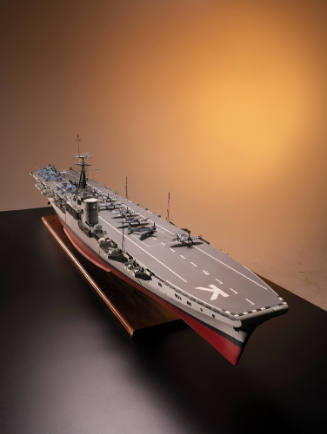
19 July 1940